


Mywifiext.net Setup Guide: Boost Your WiFi Range in Minutes
The netgear extender is easy to connect with the netgear router via WPS or mywifiext or nighthawk app. But you should check that the routers settings are correctly through the routerlogin.net admin login interface. After that apply these steps to configure the extender with the router.
Mywifiext.net Setup Instructions
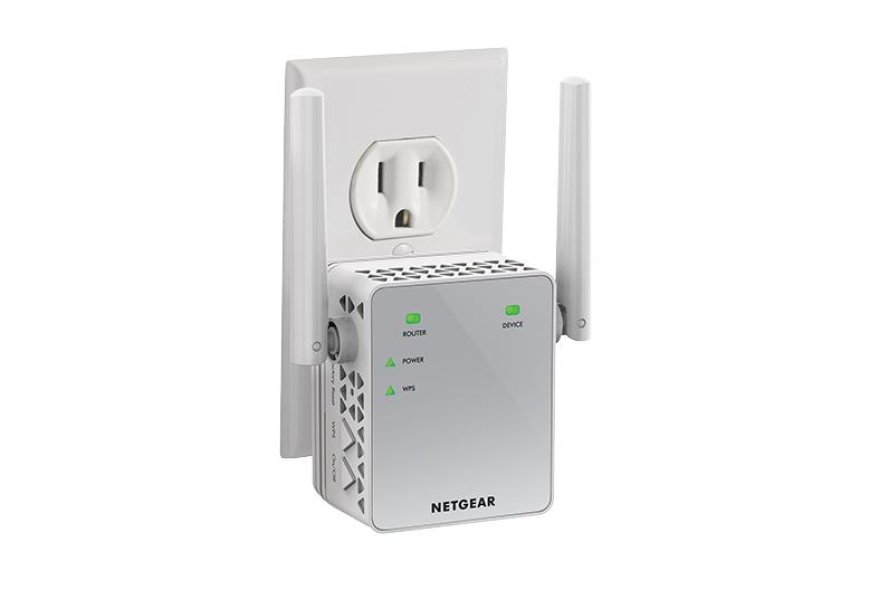
Follow the step-by-step guide to set your Netgear WiFi range extender via computer mywifiext wizard. Just start by plugging the extender in power socket.
Plug the Range Extender In
Start simple. Find an outlet that's not too far from your main router (at least for the setup part). You dont want the extender sitting in a dead zone or itll just extend garbage.
Plug it in. The power light on the extender will turn solid green means it is on. and if you see it blinking or turning orange, you should unplug, count to ten, and try again. Sometimes it just needs a minute to boot.
Connect to the Extenders Network
Now, on your laptop or phone, go to your WiFi list. You should see something like:
- NETGEAR_EXT: Thats your extenders default network.
Connect to it. No password needed (at least initially). If it asks for one, you mightve already set this thing up before and forgot. In that case, reset it (I'll cover that in a sec).
Open a Browser & Head to Mywifiext.net
With your device now connected to the extenders network, open any browser Chrome, Edge, whatever.
In the address bar (not the search bar), type: mywifiext.net Hit enter to search.
You should land on the Netgear Genie or New Extender Setup page.
If you get an error like site cant be reached, it means youre not connected to the extenders network properly. Go back and double check.
Follow Setup Wizard
Heres where most people get nervous, but honestly, its just clicking Next a few times.
- Pick New Extender Setup
- Set up admin login credentials. This isnt your WiFi password its just for logging into the extender.
- Choose whether you're setting it up as a range extender or access point. (Most of us just want the range extender option.)
- Itll scan for nearby networks pick your routers WiFi name.
- Enter your WiFi password (the one you use for your main network).
Itll set up the extender and probably create new network names like:
- YourNetworkName_2GEXT
- YourNetworkName_5GEXT
You can rename them during setup if you want, or leave them. I usually keep the name the same but add _EXT at the end just so I know which is which.
Final Reboot and Reconnect
Once setup is done, the extender will reboot.
Now, disconnect from NETGEAR_EXT and connect to your new extended network. Test the connection. Load YouTube, open some apps, check your ping whatever you normally do.
So, this is the end of the setup guide and you can connect the network without any interruption. Now, have a close look at the troubleshooting section to make the device performance better.
Troubleshooting Section
Unable to Access Mywifiext.net?
- Check computer connected to the WiFi range extenders network, not your router.
- Use the IP address 192.168.1.250 of the extender in your browser instead of URL. That often works better.
Extender Lights Stay Orange or Red?
- That means weak connection to the router.
- Move it closer to the router, set it up again, then once its working, move it back to a sweet spot (somewhere halfway between your router and the dead zone).
Forgot the Login Info?
- Press and hold the reset button (tiny hole on the back) for 10 seconds with a paperclip.
- Lights will blink, and itll reset everything to default.
More Other Tips from Experts
- Dont place it behind a thick wall or near a microwave. Yes, that matters.
- If your router has dual-band (2.4GHz + 5GHz), set both up on the extender.
- Use the Netgear Nighthawk app if your extender supports it. Its not perfect, but sometimes quicker than doing it through a browser.
The Conclusion
Hope, the extender has been installed with the help of our mywifiext.net setup guidance. At the end of the article, we have also provided tips and solutions to make the process error free.